On the Origin of Technological Civilisation.

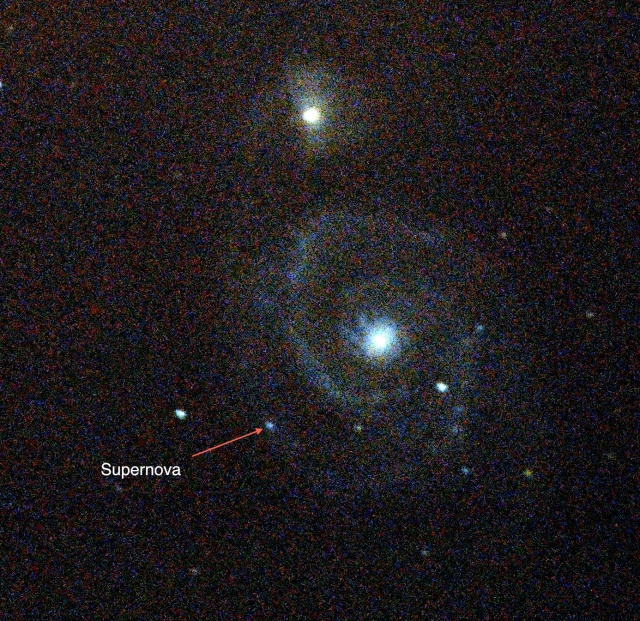
This morning a friend posted an image of a supernova on Facebook and wondered just home many civilisations died as a result. Now, if you take the standard Drake equation and use that as a basis of your estimation of technological life and hence civilisation then you may get the idea that at least one did, given the massive gamma ray bust associated with such an event. However, I don’t believe this at all, and here’s why:

The parameters usually plugged into the Drake Equation assume that eventually that the development of technological lifeforms is almost inevitable once you get life going, as is even the equivalent of multi-cellular and complex lifeforms before this. Given my perspective as an Earth Scientist by training and hence knowledge about how the Earth, the only place we know life exists, I very much dispute these assumptions.

Life is common, complex life probably not so much

If we look at the Earth as an example of how life may develop on a planet we find from the evidence that simple, single celled life appeared pretty darned quickly after the end of the late bombardment where it would have been practically impossible for anything to survive. So, we can assume that this kind of life is probably likely to spring up almost anywhere in the Universe given similar starting conditions. So, life in the Universe is common.

However, after this great “leap” life got lazy. It didn’t really change a great deal for over 2.5 billion years. OK, it had to cope with the rise in oxygen and switch power sources but otherwise it didn’t do a great deal other than maybe become symbiotic and file its DNA away into a special container. Basically, there was no evolutionary massive advantage to change, so it didn’t.

From the fossil record it currently looks as though a global climatic event effectively pushed life to co-operate so as to survive in challenging environments. Without this push, life on Earth would probably still be single celled.

So, just about a billion years ago we got multi-cellular life… Woo-hoo! It took a while before this became complex though and it seems that only when some of these found eating other life to be a convenient method of energy collection did the arms race begin and complex life began.

It was all a big accident!

Climbing the ladder to technology? Maybe not.

So, from this slow start it only took about 500 million years to get to creatures which could potentially have enough brain power to be intelligent enough to wield tools. So, why didn’t we see technological dinosaurs?

Well, technological intelligence requires a couple of things, firstly the abstract, innate intelligence and flexible world modelling capabilities so as to visualise the tool and make the imaginative leap to think them up in the first place. Secondly, you need the twist of evolutionary fate which gives the organism the body parts required to fashion and use technology.

It’s becoming more and more apparent that many creatures from many strands of life are capable of the first part. Not only great apes or primates or even mammals but birds (i.e. dinosaurs) and even molluscs (Cephalopoda, i.e. octopus). However, most of these intelligent beings are handicapped so that technological advancement isn’t practical. They either don’t have the tools, don’t have the time, live in the wrong sort of environment or aren’t social.

Also, in many ways, the pre-requisites for being technological aren’t usually the best for long-term survival in an evolutionary sense. Generalists generally find it hard to compete against specialists, unless there are specific environmental drivers which cause the specialists to fail. Humans almost didn’t make it.

So, humans are an accident?

Basically, yes. We are an aberration. We only made it as a sheer fluke. Given the odds we shouldn’t be here at all and the planet Earth would be no different than it has been since the last great extinction.

So, what does this mean for the Drake Equation?

We have to remember that we’re looking down the wrong end of the telescope at this problem and hence get a very skewed idea. We are here to observe and hence is seems that that must be proof of the inevitability of us appearing. The original parameters of the Drake Equation reflect this and are, in my opinion given the evidence, several tens of orders of magnitude too optimistic.

Well, even given the hugely, mind bogglingly big numbers of potential life harbouring planets out there it’s very probable that only a really, really tiny percentage managed to get beyond single cellular organisms. Even then the combination of factors which would allow a society to develop technology and become a civilisation are so remote and actively discouraged.

Is there anyone else out there then?

Probably not. Sorry.

Given the odds it’s quite possible that we are the very first technological beings to exist within the Universe, given that the Sol system was possibly one of the first to appear after enough building blocks had been created by the previous generations of stars.  Even if we are not, given the number of star systems out there, the time scales involved and the probable life of any species being only a couple of millions of years at best we’ve probably missed the previous ones and others will appear after we’re long gone.

We are but a fleeting island in entropy’s march.

Planets a-hoy! The benefits of getting up early.

It was an early start, 4:30am to be precise, but that’s the only time when you can catch anything really photogenic in the sky from my back garden at the moment as I’ve yet to get beyond the light pollution for the deep sky objects.

So, yes, the early start, at “stupid o’clock.”

It was a beautiful morning. The sky had lost all of the high, con-trail derived cloud from the night before, which had obscured practically everything and the air was still. It was chilly enough to need a hat and fleece but otherwise comfortable. The stars shone but were nothing beside Venus, the Moon and Jupiter.

Seeing as Jupiter had for so long been out of view I immediately slewed the telescope around to point to it, looked in the eye-piece, focused and discovered that the shadow of one of the moons was passing across the face and was close to the edge. I needed to be quick to be able to catch it in an image so rushed the “Imaging Source” camera out of its box, fitted the Baader filter and the Powermate 2.5x magnifier and started up the software.

After some critical focusing I pressed the “Capture” button and streams of data passed onto the hard disk. I’d made it. Little did I know that the first real capture was the best of the night, which, after later processing, produced this image:

Jupiter with Europa casting a shadow and Io.

5:09am: Jupiter with Europa (lower left) and Io (upper right). Europa’s shadow is just leaving the edge of the face of Jupiter.

After almost an hour of imaging Jupiter, with the glow of dawn swiftly growing, I turned my attention to the Moon. There, in the stark contrast on the edge of the illuminated half sat the crater Copernicus. Such an intricate crater with its ejector field strewn around it. So, this became my second target of the morning:

Copernicus

6:03am: The lunar crater Copernicus.

With light levels increasing and sunrise son to be upon me there was only last target, Venus.

Because I’m hardly ever up this early and because I have no view of the western sky from the observatory I’ve never actually imaged Venus before. This time I didn’t bother removing the camera from the focuser but hoped I’d be able to find the planet using the finder scope only. It took a while to fully centre in on it but eventually I did. After a few minutes of tweaking the exposure, I took my final image of the day:

Venus in the morning sky.

06:14am: Venus shining brightly.

And so, that was that. I stowed away the telescope, shut off everything, closed the roof and came indoors, and off back to bed for a couple of hours.


Astronomical events: February to May

My last update on my astronomical exploits was way back at the beginning of February. At that point I’d just got the new telescope installed and Mars was getting closer to opposition.

Between then and the end of May was quite a busy time in the sky when it came to planetary observation as Mars continued to be visible from my back garden for much of the time and Saturn came out to play as well. Unfortunately, after the third week in May both planets were obscured by the house by the time dusk fell. Even so, I managed to get some decent images.

Mars

I’d already managed to get one good image of the planet by the beginning of February but due to cloud cover the the next opportunity wasn’t until early March. Thankfully, there was a short period of very good seeing, allowing me to even image clouds developing within the atmosphere.

Details on the surface weren’t that clear, but that was partly due to the low quality of the camera and its low speed with the light levels available. Once the atmosphere became more turbulent the results were no-where as good.

So, I decided to buy a better quality planetary camera. The resolution was still 640×480 but its noise levels were far lower, so that even without getting the colour balance correct on the first go I managed to get a far better image:

Unfortunately, by the end of March the weather closed in and the next time I could get out to view the sky was in May.

By the middle of May the planet was rapidly receding from view, markedly shrinking and becoming harder to image, especially as by the time it was visible it was almost behind the house. However, because of the change of angle, it was far easier to see that it was indeed a sphere as it was easy to see its phase:

Before long, however, it became impossible to image.

Saturn

Saturn wasn’t easily visible from my garden until the clouds cleared in May, which gave me only a few short weeks in which to view and image it before it too disappeared behind the house and into the dusk. Also, most evenings the sky was just too unstable to get decent images of the planet given the amount of magnification required. Having said all that I did manage a few really pretty decent images such as this:

Mars attacks

Well, Mars is finally getting into a position where I can image it at a reasonable hour of the day (or night).

So, ths evening I had a doze in bed for most of it before getting outside and attempting to get at least one image of Mars.

Mars is rather more difficult to image tham Jupiter due to it being far smaller. Thankfully, for Christmas I got a 5x magnification lens which allows me to make the image on the “webcam” camera large enough to even attempt the task. Even so, with the degree of atmospheric disturbance I never thought I could get anything decent tonight.

Well, surprisingly, after a bit of processing in Registax, this is what I managed to obtain:


Astronomical observatory: News update

I’ve been rather quiet about the observatory and astronomy in general in this blog for quite some time now. (Actually, looking back it was last June.) So, what’s been going on?

Observations.

When the weather has allowed I’ve been out a number of times, the most fruitful being around the end of October when Jupiter was close to opposition and hence the largest it can be.

During this time the weather was helpfully quite good with a number of days of exceptionally stable air giving rather good viewing conditions (known as “seeing”). which gave me a good opportunity to try out a time-lapse video of Jupiter turning.

It took a few hours to image Jupiter using a modified web-cam device and then a further half a day to process each of the video clips into single images such as this:

Each of the images was then again put into Registax, aligned and then made into a time-lapse movie:

Which does look rather impressive.

Unfortunately, after that period the weather hasn’t been very kind and Jupiter has drifted further away from us as we journey around the Sun. Still, Mars is on its way!

After the purchase of a new telescope at the new year (more later) I’ve managed to get out only a couple of times, mostly to do tests. The best image so far has been of the Orion Nebula taken by imaging a number of times with my Nikon D90 and then combining the sub-frames into a final image:

It could be better. The telescope mount wasn’t fully calibrated, I need a light pollution filter and the stars were twinkling wildly due to disturbed air. Still, it’s a start and far better than I could achieve with the Meade LX90.

Hardware

Most of my time in the observatory has been spent trying to find ways to stop water seeping in and causing mould to form. In the end I had to spray the whole of the outside of the base with a rubber sealant paint and drill some drain holes in the roof roller rails. These seem to have mitigated the problem but I’ll know better when there’s some more heavy rain.

Other than that, the biggest news is the purchase of a new telescope with a “German” equatorial mount. The fact that the new optical tube is larger too is a side issue as the difference in price between the sizes wasn’t that great and so the biggest which would fit the observatory and the budget was the one I went for.

The reason for the change was two-fold. Firstly, the Meade LX90′ mount is rather crude and wanders all over the place, making it useless for even medium length imaging of deep-sky objects. Secondly, the fork mount, when combined with an equatorial wedge, excludes much of the sky as the mount gets in the way of the camera.

Anyway, in the end, after quite some extensive research I decided upon the Celestron EdgeHD 1100, 11″ scope. That, along with the hardware to fit it onto the observatory’s pedestal and guide scope, cost a pretty penny.

It was only after I mounted it in the observatory that I found the one big problem with the guide scope (other than the weight) and that was that it won’t fit in the observatory. (In fact, the main scope only just fits when it’s at its easterly range of travel.) Still, other than that “Doh!” moment everything’s fine.


The new ‘scope at home.

Well, that brings things up to date really… More to do in the future.

Flash, bang, what a picture.

On Friday afternoon an old friend posted on my Facebook wall a link to an article about a new supernova discovered on Thursday in one of the arms of the Whirlpool galaxy (M51) and wondered if I’d seen it.

Fortuitously, Friday evening was practically the clearest sky I’ve seen in Oxford so after Saturn became eclipsed by the house roof (which now happens annoyingly early) I decided to have a go at imaging it.

After I having to re-aligned the telescope, as the LX90 mount doesn’t seem to take care of accumulated pointing errors very well and was hence pointing in the wrong part of the sky, I managed to get on target. I swapped the eye-piece for the camera, found a nearby bright star to get focus and then moved back onto the subject.

I tried a couple of exposures, all taken using an infra-red remote control so as not to cause the ‘scope to bounce around, but only one of these was usable. The trouble is that the LX90’s mount isn’t that good at tracking the sky either, even with an equatorial wedge. It seems to jerk forward randomly every minute or so making exposures longer than about a minute practically pointless. Still, with the level of light pollution, even a minute’s exposure creates a mostly orange image.

Anyway, I had one usable image…

DSC 0095
Original image.

As can be seen, the galaxy itself is quite a subtle feature, mostly obscured by the reflected glow of the Oxford light pollution. So, the next task was to try to filter this out and enhance the galaxy within the image. I did this by adjusting the colour curves for each of the three colours and then adjusting the overall curve.

M51 full scene 2
M51 full scene 2

As you can now see, the light pollution has been greatly subdued and the galaxy stands out far greater. You can still see an artefact caused by the optics of the telescope, the subtle ring of orange with a bright dot in the centre, but this can’t easily be removed.

All that needs to be done now so as to make it an instructive image is to crop, flip (so as to remove the inverting of the image caused by the optics) and annotate…

M51 annotated cropped

And there it is!

Not quite as good as you’d get from a professional set up but adequate to show the supernova.

The making of an observatory

Quite soon after the purchase of my telescope last August I determined that the time and effort it took to deploy the ‘scope and set it up meant that most clear evenings weren’t going to be able to be utilised. Almost as soon as I’d got it all ready it was time to pack things away again, or the clouds had rolled in. I needed a fixed observatory which would allow me to start observing quickly.

After doing research on the ‘net, in early October I finally plumped for a 6ft x 6ft rolling roof shed from Alexander’s Observatories and sent an e-mail asking for a quotation. At the same time I did the same for the patio base foundation from a local landscape gardening firm, N.V.Firmin. Little did I know how long both of these stages of the project would take. In fact, I imagined that there could be a possibility of having it functional by Christmas.

Well, at least the landscape gardening firm got back to me quickly. However, after getting the quote I was a little disappointed to learn that the start date for the works would be after Christmas sometime. Still, having not heard anything from the observatory company I wasn’t too worried about the delay.

Time ticked ever onward and October became November and November became December. Finally, over two months after my initial contact, I got a reply from the observatory company. To be honest I was expecting never to hear anything at all at this point and was starting to look at alternatives. Still, the quote was good so I gave the go-ahead and sent the deposit, which was cashed on Christmas Eve.

Everything went quiet for a few weeks and it wasn’t until the end of January that I heard from the landscape gardening company. Typically they wanted to install my patio and fencing the weekend I was away down in Cornwall for my and my Dad’s birthday. (Don’t you love the way life works that way?). Anyway, they started work the day before I left so I was able to survey their markings on the lawn after I got home (in the dark) and made amendments. For good measure I drew a sketch plan and taped it to the inside of my patio doors. I was very glad to discover after my return that everything was in order and a very nice job had been made.

patio1
Early February: The patio is almost complete. (The hole is for the pedestal foundation.)

At this point I had assumed that the observatory company’s quote of 8 to 12 weeks for delivery was still on track and that soon I’d get the template for the pedestal base foundation. However, I’d not heard anything since before Christmas, so I sent an e-mail informing the company that the base was ready and could I please have the template…

Another month passed and I was about to send another e-mail when out of the blue the template appeared. It was now 10 weeks after I’d paid my deposit and was getting a little concerned that I hadn’t heard anything more.

A couple of weeks later I sent off another e-mail and was surprised to get a reply back within three days informing me that work on my build would be starting in a couple of weeks and the delay was caused by a number of large observatories in the queue before mine. This, I assumed, meant that the timer for the delivery of my unit would then start, i.e. it would be 8-12 weeks from that point. I was not that happy.

You an imagine then the pleasant surprise I got when just a couple of weeks later I received a text message asking if it was OK to deliver the shed the following Thursday. Of course I said yes!

So, after months the day of the observatory arrived… 7th April, 2011.

Nick duly arrived at 8:30am, not long after his ETA and surprising seeing as he had driven directly from Norfolk, and he started right away… with the help of the first coffee of the day.

1stbase
8:35am: The base goes down. (Note the first coffee of the day.)

Due the relatively small size of the observatory Nick was able to prefabricate most of the parts and carry them all complete in his van, so in came the base and quickly the chipboard floor panels went down, cutting a hole for the pedestal.

cuttinghole2
8:47am: Base complete, pedestal hole cut.

It didn’t then take very long until the walls came in one at a time, they were lined with single ply and the observatory started to take shape.

wallsup
9:48am: The walls are up.

Nick at this point was on his third mug of coffee, along with biscuits. It’s thirsty work, especially when it’s the hottest day of the year so far and the area’s a bit of a Sun trap.

The next part of the build was to install the supports for the roof rails and the rails themselves. Basically, the supports are just 75mm fence posts. The horizontals slot into recesses in the walls and are supported by other posts at the most distal end from the shed.

railsupport2
11:18am: The roof rail supports are being fitted.

Once these were complete and the aluminium tracks installed it was time to install the roof. The main wood lattice structure was delivered as a single unit. Onto this was screwed the part of the southern side of the shed which slides with it before, finally, the wheels were installed. The whole thing was then lifted by the both of us onto the shed.

onwiththeroof
12:15pm: The roof structure is on.

The roof was now fitted with chipboard sheets which were then covered with roofing felt before more shuttering was installed at the gable ends. The project was starting to look almost complete. More coffee helped… And most importantly, the roof rolled.

theresherolls
2:05pm: The roof rolls for the first time.

From this point on things slowed down a little as it was all about installing the final details such as the door, the roof locks. Once these were done it was time to bolt down the pedestal.

pedestal
3:10pm: The pedestal is installed. Build complete.

And so, by half-past three the installation job was complete and Nick was on his way back to Norfolk.

I spent the rest of the afternoon and evening setting up my telescope for the first time in its new home. I had to rotate the pedestal by one bolt hole so that it was closer to being aligned north-south and then level its top.

Although the basic structure was now complete there was still no power in there and most importantly the strut which joined the two rail supports together was rather inconveniently at nose height. This would be rather tricky to navigate in the dark so I needed to raise it above head height. Also, I wasn’t happy with having the chipboard floor exposed to the weather and so I decided to clad the base with some wood cladding. Another inconvenient problem was that the eastern folding panel was too close to the ‘scope and hence couldn’t be folded down.

All these problems were fixed the following weekend. I used a sledgehammer and a block of wood to ease the whole observatory 5cm away from the house, relieving the folding panel problem before re-engineering the strut and bolting the legs down.

finished
The Weekend: The finished product, well almost.

And so it’s finished… well almost. I’ve still got to paint the inside and then there’s the proper final alignment of the ‘scope mount but it’s mostly there. I certainly didn’t expect last October that the whole project would take six months to complete.

But does it meet my requirements? It would be a bit sad if it didn’t. Well, let’s say that I can now go from deciding to go out to do observation to getting the first object in the eye piece in a little over four minutes and it takes a similar amount of time to close things down again. So, yes. A definite improvement on the 40 minutes it took previously.

Astrophotography, the beginning.

As mentioned in a previous post, I’m recently bought a new telescope with the thought of using it for astrophotography.

Now, seeing as the last part of the order turned up a little over a week ago, the equatorial wedge, I’m finally in a position to start on the project in earnest. To this end I went out shopping on Saturday for a camera and a machine to drive the camera and the ‘scope.

Having read quite a great deal and seen images which other people have managed to take, I opted for the Nikon D90 as the camera body to obtain. Currently, it’s probably the best time to get one of these cameras as it is about to be replaced by the D7000 and hence the street price is at its lowest. Waiting for the D7000 to appear would be counter productive as it will not only be at a premium price which is almost double that of the D90 but also doesn’t have anything really to help with the task at hand. (The main improvements over the D90 are in the realms of auto-focus and a more robust, and heavier, body.)

Unfortunately, because it is about to be replaced it is becoming scarcer, which meant that I could only find it as part of a kit with a lens I don’t actually need. Oh well.

On the control machine front, I picked up a netbook. The twin-core, 1.6GHz Atom processor powered Acer Aspire-One 533 should be ample for the task. There’s not a great deal of processing power required to control the camera, acquire the images or run Stellarium or similar to drive the ‘scope. I just need to get a serial cable now.

Anyway, Saturday evening was a beautiful evening with crystal clear skies, which gave me a good opportunity to have a first experiment.

The results? Well, OK for a first attempt. It’s very difficult to get a good focus when looking though the viewfinder. My first target was the Moon:

moon1

Not too bad for a first attempt…. Then over to the Dumbell Nebula:

dumbell1

As you can see, this 60 second exposure really shows up the problem with light pollution in the area I live. I’m going to have to look into getting a light pollution filter.

Finally, I spent a little while trying to image Jupiter. The best I managed was this:

jupiter1

I’m definitely going to have to look into ways of getting a sharper focus. Not all of the fuzziness is caused by atmospheric disturbance.

Anyway, following on from my photographic exploits I noticed one of the Jovian moons, Io, coming out from behind the planet. It’s amazing but you can actually see it move relative to the planet with the gap visibly changing in only seconds. It must be moving at quite a speed.

Still, I’m not likely to get another chance to play in the near future, looking at the weather forecast. The next items on the shopping list: landscaping with paving and a rolling roof observatory such as this:

observatory
observatory

A tale of two telescopes.

I’ve just taken delivery of a new Meade 8″ LX90-SC telescope and tonight had the first chance to take it for a spin, as it were. This is despite the British weather trying its best to get in the way. Still, the breaks in the cloud were big enough for me to align the ‘scope.

I have been surprised by the contrast between this ‘scope and the one I bought for my Dad the Christmas before last, however. That ‘scope seemed to be a Friday afternoon job. It arrived with the wrong type of Autostar controller and the battery boxes weren’t (and still aren’t) connected properly. Also, it was far harder to get it to align properly and never seemed to do so accurately enough. His ‘scope is a 10″ Meade LX90-ACF (i.e. has the more expensive optics).

My new ‘scope, on the other hand, seems far better put together. Other than a slightly bent bolt on the tripod, which is used to hold the ‘scope on the tripod, everything is in good working order. Not only this but the alignment process actually works and works well. I think this is partly helped by the replacement of a electronic compass and level (which never seemed to work) with a good, old-fashioned compass with a bubble.

Just to show how good the alignment and calibration was, I set the ‘scope to point at Jupiter about 10 minutes before it rose above the roof of a near-by house. (It also happened to be in cloud as well, but that’s beside the point.) When it did appear it was right in the centre of the field of view. I didn’t need to tweak it at all. This never was possible with my Dad’s ‘scope.

Also, the image was a great deal better than with my Dad’s ‘scope, and the magnification seemed higher (with the same type of eye-piece), even though they’re supposed to have the same focal length. This was very unexpected as the ‘scope is smaller and has the cheaper optics.

Am I happy? Yes. Other than the minor problem with the bolt, which makes it slightly more difficult to set the kit up and dismantle it again, it’s actually better than I expected.