Over last weekend I attended the Lavecon event just outside Northampton. This event came out of the fan response to the development and release of Elite: Dangerous from Frontier Developments and started off a couple of years ago as merely a get-together of those who produced the Lave Radio show and a few others. It’s now a quite large two day convention.
Anyway, displaying (and selling) there wares were the team who have been creating a low-cost head tracking device, called EDTracker, which allows the wearer to change the view in a compatible game according to the direction that their head is pointing. This gives a rudimentary “virtual reality” experience without the head mounted display. Seeing as the latest “Pro” unit, which contains a magnetometer as well as accelerometers, was on sale for £40 I thought it worth a try and bought one.
Given the slightly fiddly nature of the set up and the EDTracker web site not having an up-to-date set-up procedure I thought I’d write my own set of set-up instructions from the point of view of a user rather than a developer and put everything in one place.
Setting up the EDTracker Pro for the first time.
Setting up the hardware:
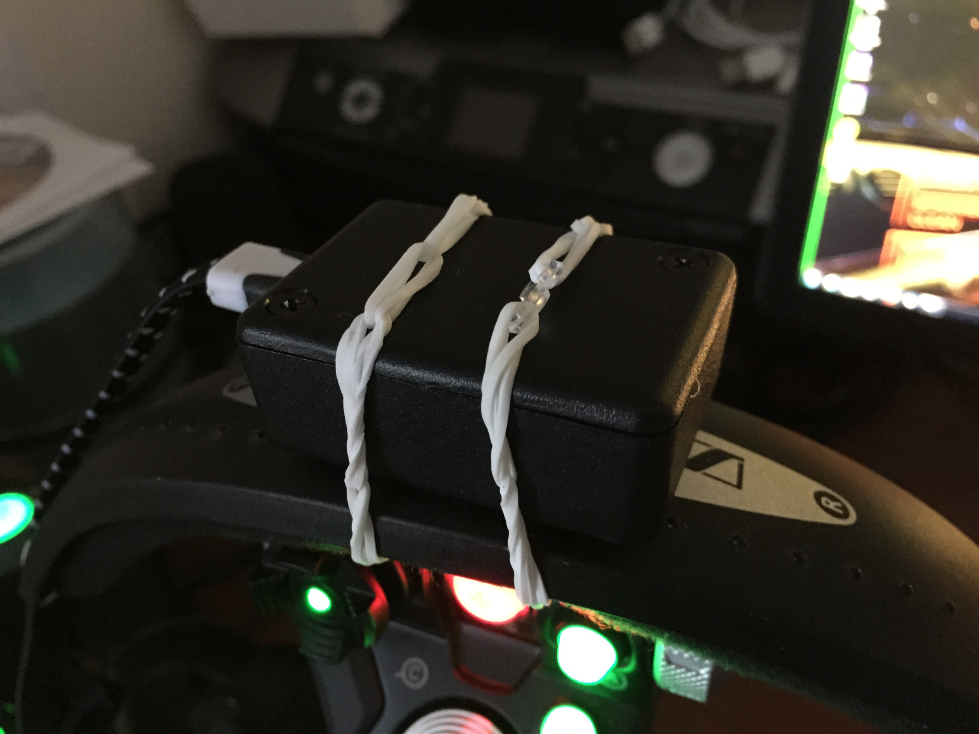 The first thing that you need to do once you get the device out of the box is to mount it on some sort of head gear. Most people fit it to the top of some headphones as they’ll be using those with the game anyway. At Lavecon EDTracker were selling rubber bands to do the job, but you may want to use something more permanent.
Fit the unit on the top so that it’s level when you wear the headphones and with the USB port pointing towards your left ear. Contrary to common sense, the box needs to be fitted with the screws uppermost.
Now sit the headphones on something so that the device is level and stationary. I found that hanging them upon my joystick worked well.
Plug the USB cable into the device and secure the cable to the side of the headphones headband so that it doesn’t pull on the box and make it move. Then plug it into your PC.
Windows will now detect the device and attempt to load a driver. Ignore any advice on the EDTracker website about the rest of the set-up as this is NOT for the Pro model.
After a while Windows will tell you that it’s installed the driver. This can take a number of minutes, so be patient.
If you now open the “Devices and Printers” tool in Windows you will now see a new gaming device, the EDTrackerPro. The Pro pretends to be a joystick.
Setting up the software.
You will now need to download some software to configure and use the device. Unfortunately the EDTracker website download section is not really helpful here and is hard to navigate but what you need is the EDTrackerPro GUI. (Click on the link to download it.)
To work with Elite: Dangerous without further configuration of the game you’ll also need opentrack 2.2.
Neither of these pieces of software use a Windows installer, so it’s easiest if you create an EDTracker (or some other folder) on your desktop and unzip them within that for easy access as you’ll need both of them every time you want to use the device.
Once you’ve done this go into the EDTrackerPro_GUI folder and run “EDTrackerPro”
A window should now open with a green bar over the top of the bald head saying “EDTracker Connected”.
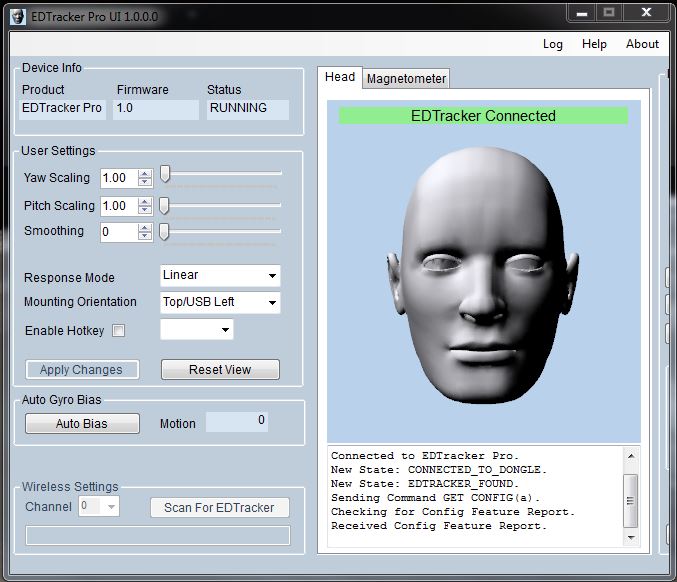 Change the settings so that they match those in the above figure. Now click upon the “Magnetometer” tab and the display will change…
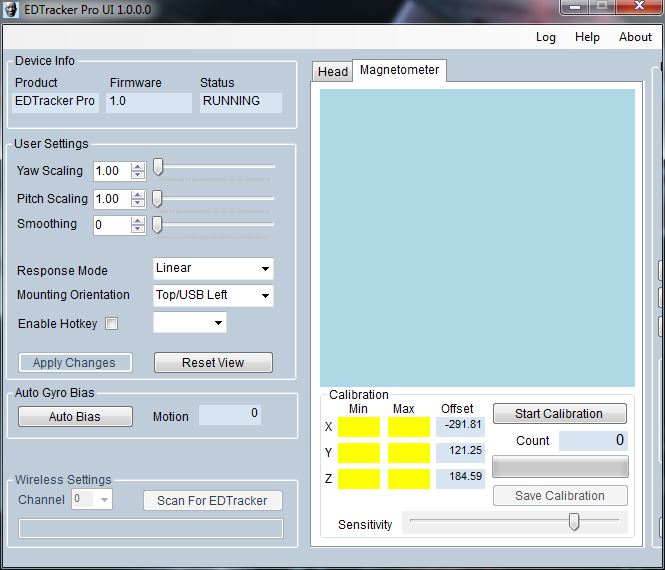 You now need to calibrate the magnetometer within the device so that it can use the local Earth’s magnetic field as a reference to prevent the tracking drifting over time. Once you click on “Start Calibration” a video will pop up in a new window showing you what you need to do. Basically it involves rotating the headphones 360 degrees in each orthogonal direction so the local magnetic field can be mapped. Pick up the headphones and do this a few times and then click on the “Save Calibration” button. You should only need to do this once for each location you use the device in. If you always use it in the same place then you only ever need to do it once.
Now click back on the “Head” tab to get back to the original view and hang the headphones back on the joystick, or whatever you have been using. Without touching the headphones click on the “Auto Bias” button. This will allow the system to calibrate the accelerometers so that they don’t drift.
Put the headphones on, look straight ahead and click on the “Reset View” button to set the “centre” position.
Right. That’s the device configured, now for the interface software for the game. You can close the EDTrackerPro program.
Navigate to where you unzipped opentrack and then down to where the program files are lurking. Run the “opentrack” program. This will need to be started and kept running whenever you wish to use the EDTracker Pro within Elite: Dangerous as it provides the software glue.
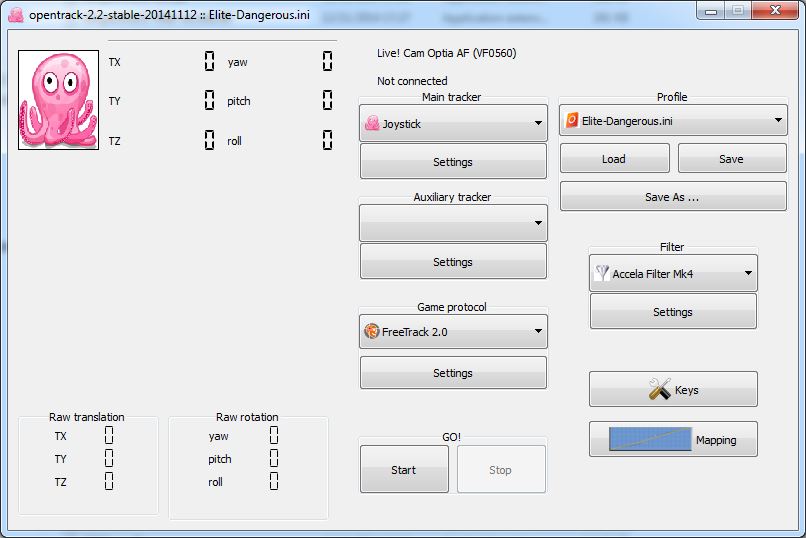 To begin with opentrack will not see the EDTrackerPro but may show the name of your webcam. Under “Main tracker” click on the top button and select “Joystick”. Now click on the “Settings” button and you should be able to select “EDTrackerPro” from the list.
Now, under the “Game protocol” section select “FreeTrack 2.0” as in the figure above. So as to damp any small fluctuations due to reading errors and the like select the “Accela Filter Mk4”.
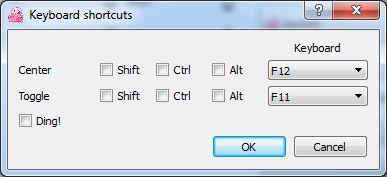 Click on the “Keys” button to set the hot keys to turn the tracking on and off and to re-centre. I’ve chosen F12 and F11 in the above example. Click “OK” to return to the main window. You can now click on the “Start” button.
We’re not finished yet as at there is no mapping between the EDTracker’s motion and the output of the program. To set this up click on the “Mapping” button.
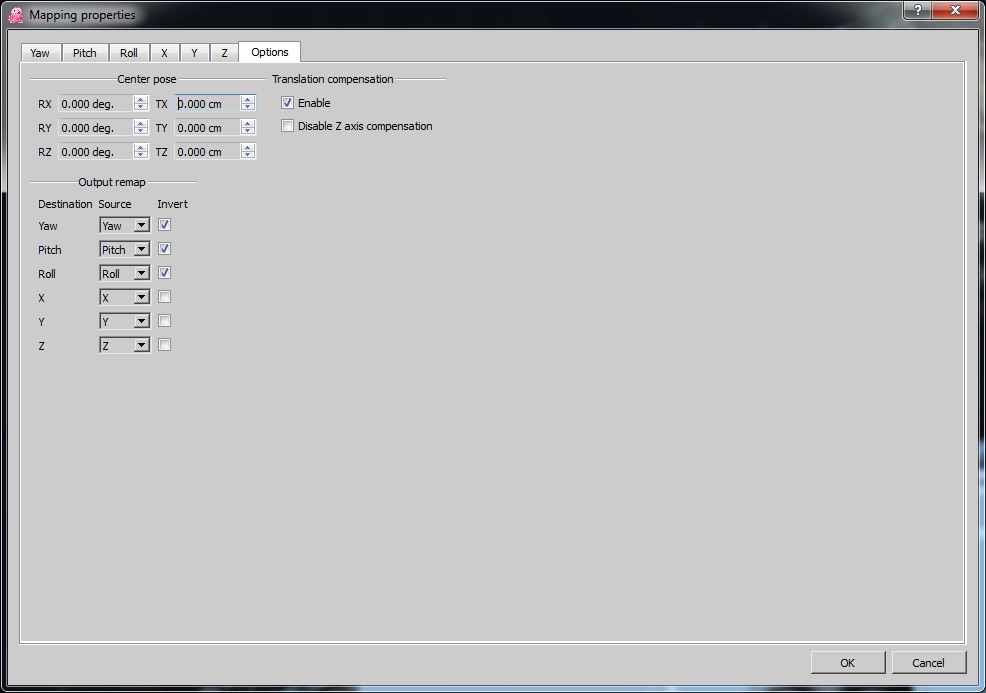 First select the “Options” Tab. Tick the “Invert” box for each of the three axes.
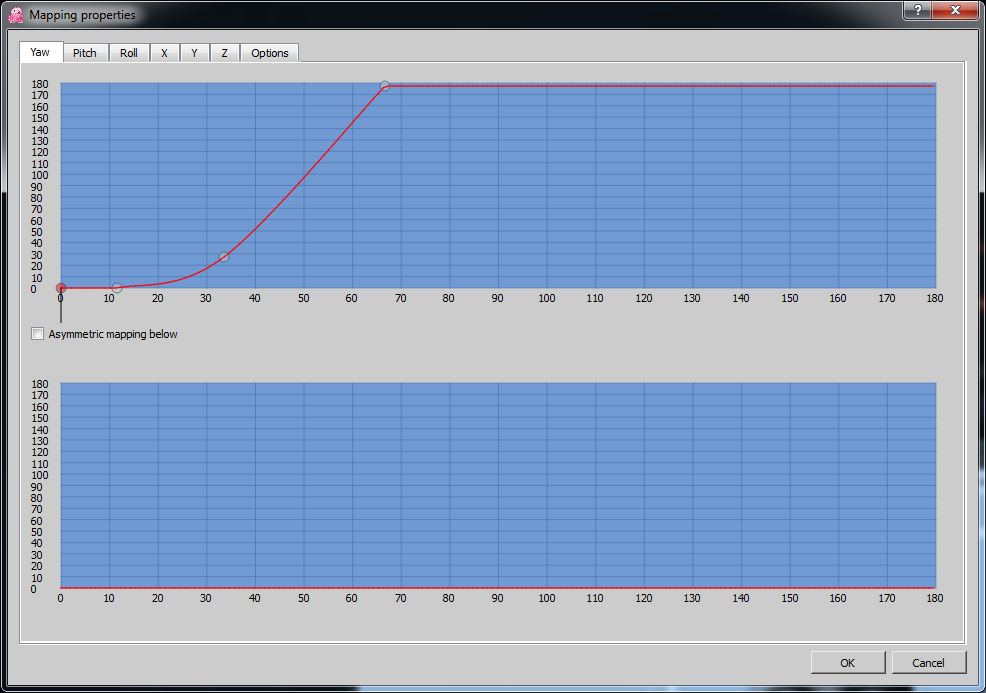 Now click on the “Yaw” tab. Put your mouse pointer in the bottom right corner of the top graph, click and drag upwards. You will see a point and a line move with your cursor. The diagonal line is the mapping between the input value from the EDTracker’s Yaw axis and the output of the program. You can create more control points by clicking on this line and then you can drag them to make a curve or increase the sensitivity of the tracking. The curve I’ve created in the figure above gives a dead zone close to the centre so that small head movements when looking around the cockpit at the front don’t cause any motion and then a smooth motion after that to a full look to the left or the right by turning my head ~65 degrees.
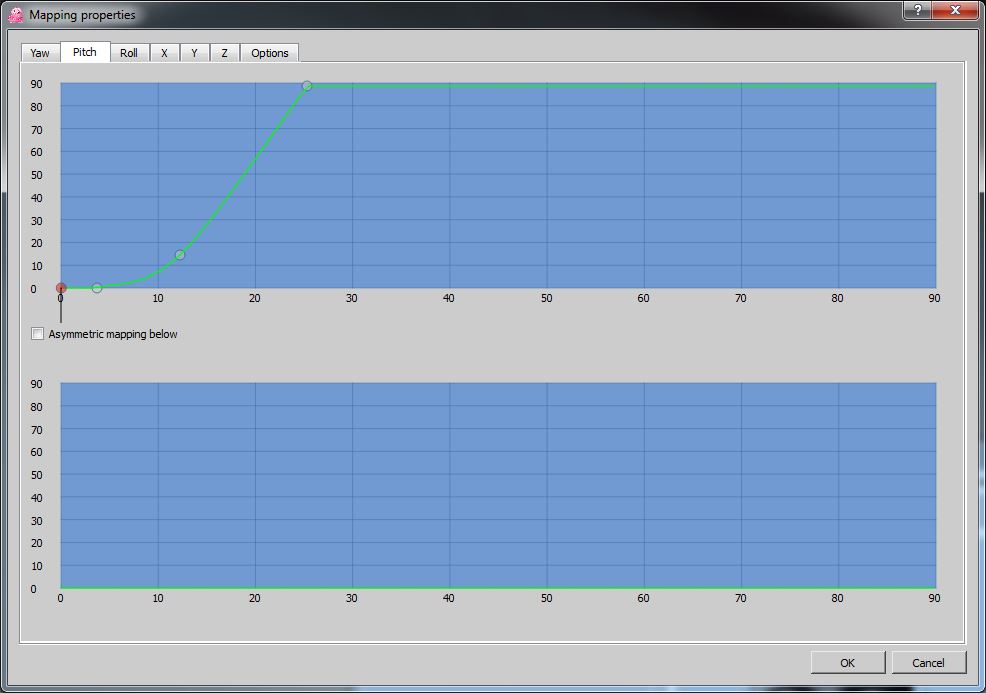 Similarly you need to do the same for the “Pitch” axis.
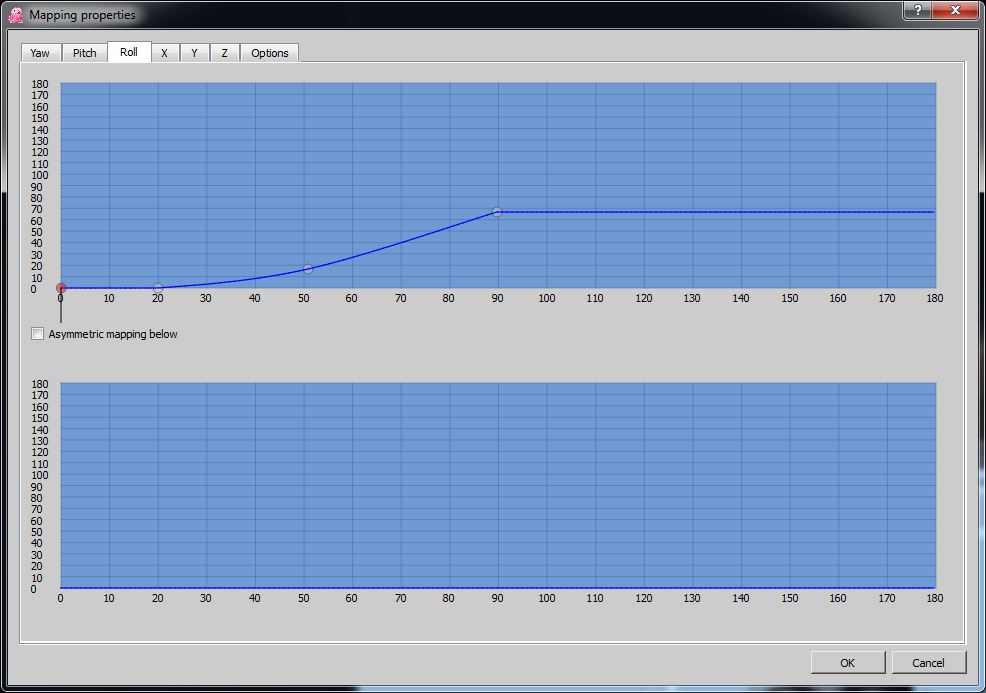 And finally for the “Roll” axis. I found that the roll was giving me problems and so I decreased the sensitivity greatly.
You can now close the mapping window and save the settings. I created an new settings file for Elite: Dangerous, a copy of which you can download here.
You can now start Elite: Dangerous and the game will automatically use the head tracker! No configuration is necessary. It’s best to test it out using the first of the tutorial missions. You can change the mapping, as above, to suit your tastes.
Note: If you have issues with the mappings bouncing around or being 90 degrees out it’s probably due to Windows “calibrating” the “joystick”. Go into the “Devices and Printers” tool, open the properties for the EDTrackerPro and reset to default. This should sort it out and was discovered at Lavecon by one of the EDTracker team when I had issues.
Day-to-Day Use.
Every time before you use the EDTracker Pro you will need to do the following:
- Run the EDTrackerPro GUI program, hang the headphones up as above and run the “Auto Bias”
- Only if you are in a new location you will need to re-calibrate the magnetometer.
- Run the opentrack program and click on the “Start” button.
Once you’ve done this you’re ready to run Elite: Dangerous and play!
[Edit: 2015/11/15 12:10 GMT]
I’ve now uploaded a new version of my OpenTrack configuration file without any real dead-zones. I’ve been using this for a few months now and it works well and doesn’t have a real dead-zone in the centre and also doesn’t give me any motion sickness effects.
[Edit: 2016/01/24 09:45 GMT]
Changed link to software to point to the new Pro website, http://www.edtracker.co.uk/
[Edit: 2017/02/18 15:40 GMT]
Updated link to EDTrackerPro GUI installer to point to the latest MSI installer version.